
Instruction Manual, Warranty and Replacement Parts for the Aquascape Signature Series 1000 Pond Skimmer (#43022)
The Aquascape Signature Series 1000 Pond Skimmer provides efficient mechanical filtration by removing unwanted debris from the surface of the pond, significantly reducing maintenance and improving water quality. The filter also provides a protected location for the pump, extending pump life.
Splash Tip: We recommend the Signature Series 1000 Pond Skimmer for ponds up to 30′ x 40′. If you have a bigger pond, contact us for custom solutions.
The Signature Series 1000 Pond Skimmer is easy to install. The filter includes a large volume, rigid debris basket for quick and easy maintenance and a high-quality, medium density rigid filter mat to remove smaller sediment and debris. The extremely durable, UV protected, high-density polyethylene construction and the rounded shape maximize the strength of the filter, enabling installation in freeze-thaw conditions.
The Signature Series 1000 Pond Skimmer is backed by a limited lifetime warranty, ensuring year after year of trouble-free use.
Aquascape Signature Series 1000 Pond Skimmer Instruction Manual
Aquascape Signature Series 1000 Skimmer Warranty
Lifetime Warranty
Aquascape warrants that the Signature Series 1000 will be free of manufacturing defects for the lifetime of the product if properly installed and maintained. Proof of purchase required. Warranty does not cover damage resulting from negligent handling, misuse or lack of reasonable maintenance or care. If upon Aquascape’s inspection, the skimmer shows evidence of a manufacturing defect, Aquascape’s liability is limited, at Aquascape’s option, to the repair of the defect, replacement of the defective product, or refund of the original purchase price.
The warranty excludes costs of labor, removal of product, shipping and expenses related to the installation and re-installation of the product. All products that include plumbing (tubing, pumps, check valves) need to be properly drained and winterized otherwise warranty is null and void. No liability for loss or damage of any nature or kind, whether arising out of or from the use of the product, whether defective or not defective, is assumed by Aquascape, Inc. or its affiliates. Aquascape shall not be liable for any incidental, consequential or other damages arising under any theory of law whatsoever
One Year Warranty
Aquascape warrants that the plastic internal parts of the skimmer will be free of manufacturing defects for one year from the date of purchase of the product if properly installed and maintained. Proof of purchase required. Filter pads and media are consumable items and are not covered under any warranty.
If upon Aquascape’s inspection, the plastic internal parts shows evidence of a manufacturing defect, Aquascape’s liability is limited, at Aquascape’s option, to the repair of the defect, replacement of the defective product, or refund of the original purchase price. The warranty excludes costs of labor, removal of product, shipping and expenses related to the installation and re-installation of the product. No liability for loss or damage of any nature or kind, whether arising out of or from the use of the product, whether defective or not defective, is assumed by Aquascape, Inc. or its affiliates. Aquascape shall not be liable for any incidental, consequential or other damages arising under any theory of law whatsoever.
Aquascape Signature Series 1000 Skimmer Contents

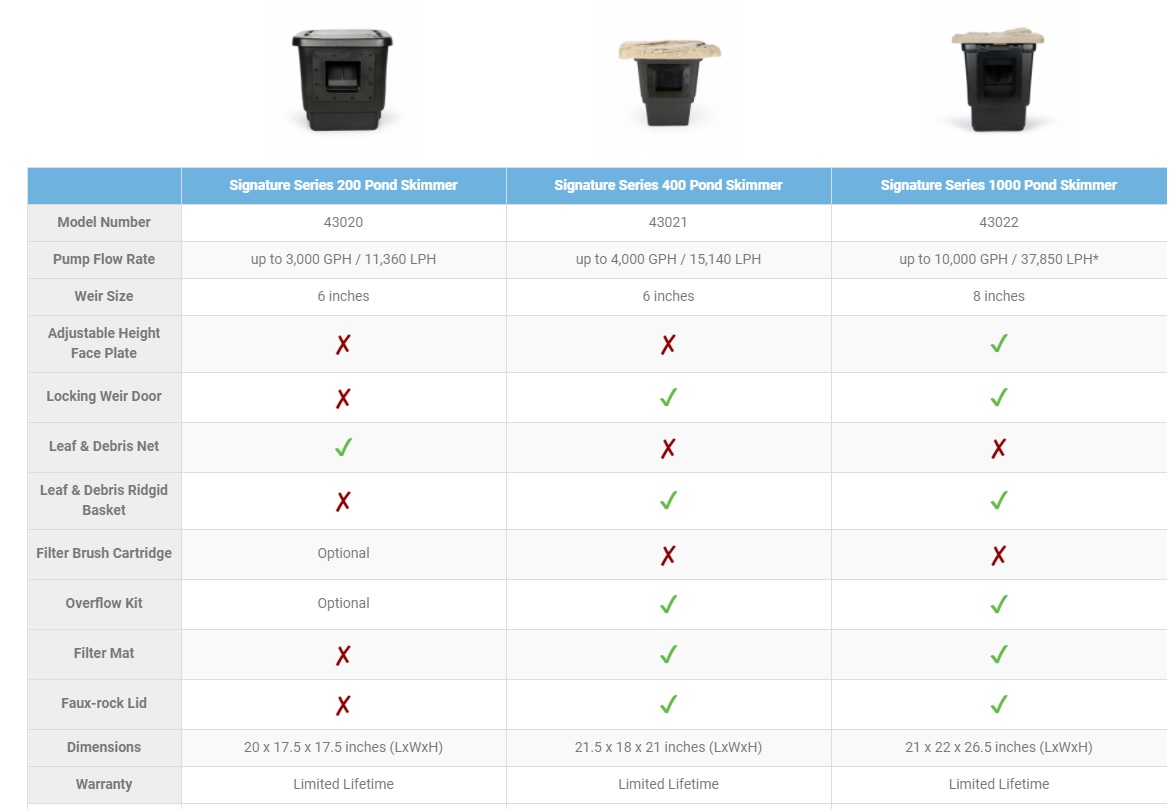
Aquascape Pond Skimmer Comparison Guide
 | | | |
| Signature Series 200 Pond Skimmer | Signature Series 400 Pond Skimmer | Signature Series 1000 Pond Skimmer | |
| Model Number | 43020 | 43021 | 43022 |
| Pump Flow Rate | Up to 3,000 GPH | Up to 4,000 GPH | Up to 10,000 GPH |
| Weir Size | 6 inches | 6 inches | 8 inches |
| Adjustable Height Face Plate | - | - | ✔ |
| Locking Weir Door | - | ✔ | ✔ |
| Leaf & Debris Net | ✔ | - | - |
| Leaf & Debris Rigid Basket | - | ✔ | ✔ |
| Filter Brush Cartridge | Optional | - | - |
| Filter Mat | - | ✔ | ✔ |
| Faux-Rock Lid | - | ✔ | ✔ |
| Dimensions (LxWxH) | 20" x 17.5" x 17.5" | 21.5" x 18" x 21" | 21" x 22" x 26.5" |
| Warranty | Limited Lifetime | Limited Lifetime | Limited Lifetime |
| View Product | View Product | View Product |
Aquascape Signature Series 1000 Pond Skimmer Installation
Recommended Tools
- Wheelbarrow
- Brightly-Colored Spray Paint
- Screwdriver
- Soil Tamper
- Shovel
- Carpenter’s Level
- Channel Lock
- Scissors

Step 1: Placement of the Skimmer
- In order to maximize circulation, the skimmer should be placed directly across from a waterfall. If you do not have a waterfall, use your area’s prevailing winds to determine where you should place your skimmer along the longest axis. Use the wind to help push the debris toward the skimmer (Ex. 1).

Step 2: Excavating Your Pond Basin
- If you are installing the skimmer on an existing pond, skip this step and proceed to step three.
- We suggest excavating the pond no more than 18-24″ deep. This depth provides the proper water levels required for aquatic plants and is deep enough to keep fish alive during winter.
- The excavation should be dug with a series of shelves. The shelves will add stability to the walls of the pond and will also create planting beds for different types of aquatic plants.
- The first shelf should be about 8-10″ deep, or the height of a standard shovel blade (Ex. 2).

• Dig the second shelf another 8-10″ deeper (Ex. 3).

- The third shelf (if desired) will be excavated down another 6″ reaching a final excavation of 24″ (Ex. 4).

Step 3: Excavating Your Skimmer Location
- When installing the skimmer onto an existing pond, you will need to drain the water from the pond. If you have fish, save some water from the pond and place in a large bucket, kiddie pool, or cooler. Net your fish and place them in your container. Be sure to add an aerator and keep the fish in a shaded area.
- On existing ponds, remove any rock that is in front of and within 3 feet on either side of where you will place the skimmer. Pull your existing liner and underlayment back into the pond 3 to 4 feet from the edge to expose the area that needs to be excavated for the skimmer.
- We recommend placing the skimmer upside-down in the position you have chosen. Overhang about 6″ towards the inside of the pond to allow some slack in the liner and make attaching the exterior liner plate easier.
- Using a can of brightly-colored spray paint, trace around the skimmer to outline the area that is to be excavated.
- Excavate the skimmer to a depth so that the proposed water level in the pond is approximately 3/4″ below the top of the opening of the skimmer (Ex. 5). If installing on an existing pond, use the known water level as your guideline on how deep to excavate the skimmer.

- Make sure the excavated area under the skimmer is compacted and level.
- Install the two bulkheads into the back of the skimmer prior to dropping into the excavated hole. Make sure the rubber gasket is installed on the inside of the skimmer (Ex. 6). The filter has two openings on the back, allowing multiple plumbing options.

- Use a 2-foot bubble level to make sure your skimmer is properly set into position. Your skimmer should be level from side to side and front to back (Ex. 7).

Step 4
Installing the Skimmer
- For single pump applications, the pump plumbing line attaches into one bulkhead and the optional overflow or 2″ plug (if no overflow is desired) can be attached to the other (Ex. 8). Use the angle of the bulkheads to your advantage by choosing the bulkhead that works best with the direction you want to run your plumbing.

- For double pump applications, each pump will hook up to one of the bulkheads. A third hole will need to be drilled in the back of the skimmer if you want to add an overflow. A drill point guide can be found on the back of the skimmer between the existing ports. Use a 3″ hole saw to drill the opening for another 2″ bulkhead fitting (item #29103 sold separately) (Ex. 9).

• Install a PVC slip fitting into each bulkhead on the outside of the skimmer to receive the pump plumbing and overflow plumbing.
NOTE: Use silicone sealant (#22010) or (#29186) or Teflon tape (not included) to coat the threads of the fittings, providing a watertight seal.
Attaching the Skimmer Exterior Liner Plate
NOTE: Power tools are not recommended for installing the screws and may strip the threaded nut inserts.
- Thread the two included liner installation tools into the upper left and right corners of the interior weir plate assembly. Make sure the interior weir plate assembly is oriented with three screw inserts across the top and four screw inserts across the bottom (Ex. 10).

- Then install the interior weir plate assembly into the inside of the skimmer, guiding the two liner installation tools through the top left and right screw holes of the skimmer (Ex. 11). The liner installation tools will hold the interior weir plate assembly in position during the remaining liner installation steps.

- Once the interior weir plate assembly is in position, apply a thick bead of fish-safe silicone sealant (#22010) or (#29186) around the skimmer opening over the nut inserts as pictured (Ex. 12). This will help to create a watertight seal.

- Wipe the section of liner that is to be connected to the skimmer free of any dust or debris. Bring the liner up toward the face the skimmer. Do not press the liner up against the silicone or skimmer opening at this time. Make sure the liner does not have any wrinkles when positioning it in front of the skimmer. Also make sure you have some excess liner below the skimmer opening to eliminate any tension on the skimmer exterior liner plate when setting boulders near the filter.
- Once the liner is in the proper position, puncture the liner over each of the top two liner installation tools, allowing the liner to hang in place (Ex. 13). Do not press the liner against the silicone or skimmer opening at this time.

- Now slide the exterior liner plate over the top two liner installation tools and press the exterior liner plate and liner against the silicone and skimmer opening.
IMPORTANT: Make sure the exterior liner plate is installed with three holes at the top and four at the bottom.
- Fasten the exterior liner plate to the skimmer with the included screws, using an awl or nail to puncture the liner through the screw holes prior to threading in each screw. Start with the two bottom middle screws followed by the top middle screw, located between the liner installation tools. Then install the remaining screws on the sides of the skimmer opening.
- Remove the two liner installation tools from the upper corners and install the final two screws (Ex. 14).

- Using a knife or pair of scissors, cut the liner opening along the interior edge of the exterior liner plate (Ex. 15). Your skimmer exterior liner plate installation is now complete.

- Let dry for at least one hour before introducing water
Optional Overflow Installation Instructions
- The built-in overflow will allow the water in an overflow situation to flow through the pipe and drain away from the pond. Use the 2″ plug to plug the bulkhead if you do not want the overflow option.
- Excavate a trench for a section of PVC Flex pipe to come off the back of the desired bulkhead. The trench should be no less than 5 feet from the back of the skimmer and graded away from the pond (Ex. 16).

- Create a drainage area at the end of the pipe by excavating a small pit, roughly 16 inches in diameter and at least 12″ deep. Fill the pit with excess gravel.
- Prime and glue a section of PVC Flex pipe into the bulkhead and run it to the top of the gravel pit. Cover the gravel pit with a small section of underlayment and top with soil.
- Install the overflow elbow into the corresponding bulkhead on the inside of the skimmer. Use silicone sealant (#22010) or (#29186) or Teflon tape (not included) on the threads prior to installing the fitting. Hand-tighten the fitting in the bulkhead as far as possible with the overflow arm in the highest position. The final overflow adjustment can be made once the final water level is set using the adjustable skimmer exterior liner plate. See the section on adjusting the adjustable exterior liner plate and overflow.
Step 5
Add Rock and Gravel
NOTE: You can expect to use several tons of stone and gravel for a complete water feature installation. Below are some helpful formulas for choosing stone and gravel for complete installations.
Stone Calculation for the Pond
Length (ft) x Width (ft) / 65 = Tons of boulders
Gravel Used in the Pond
Pond Gravel = 30% total tons of pond boulders
- Start from the bottom and set the largest character boulders first against the vertical walls, then stack the smaller boulders on top (Ex. 17).

- Be careful not to damage the liner when placing boulders.
- The opening on the front of the skimmer can be hidden by placing boulders on both sides and bridging a stone or piece of driftwood across, creating a cave effect. NOTE: Make sure the boulders do not block the water flow into the skimmer.
- Cover all remaining flat surfaces inside the pond with a couple inches of decorative gravel. This will help lock the boulders in place and cover the remaining liner, protecting it from ultraviolet rays and giving bacteria a place to colonize.
Wash Rocks and Gravel
- Using a garden hose, wash the rock and gravel down in order to remove any dust and dirt. Use a pump attached to a scrap section of pipe to drain dirty water. The pump can temporarily be placed in the lowest point of the pond and the dirty water discharged to a drainage area in the yard.
Step 6
Complete the Skimmer Installation
- Insert the filter mat support rack into place at the bottom of the skimmer.
- Place the pump at the bottom of the skimmer (Ex. 18). Follow pump instructions and refer to (Ex. 20).

- Once inside the skimmer, feed the electrical cord over the depression located on the back, top edge of the skimmer (Ex. 19).

- The Aquascape Check Valve 2.0 (#48026) (included with Aquascape pond kits or sold separately) comes with two adaptors used on each end of the check valve. One adaptor threads directly into the pump and the other threads directly into the bulkhead on the back of the skimmer (Ex. 20).

- Connect the check valve to both the bulkhead and the pump at this time (Ex. 21).

- The overflow, threaded into the second bulkhead, will help maintain the maximum water level in the pond after rainfall, ensuring that your skimmer works properly and water does not travel over the edges of the liner (Ex. 22). Refer back to the previous section for overflow information.
- Place the included filter mat into the skimmer box with the pre-cut hole oriented in alignment with the desired plumbing route (Ex. 23).
- Attach the debris basket handle to the debris basket by pushing the tabs into the basket (Ex. 24). Then place the basket into the filter with the opening on the basket facing toward the weir opening of the skimmer.

Step 7
Fill Pond and Set the Adjustable Exterior Liner Plate
- The patented adjustable wier door opening allows the final water level of the pond to be adjusted. Please note that this feature is for making final adjustments and tweaks to the water level. It is important the skimmer was set to the proper water level during initial skimmer installation. If adjustment of the weir does not allow for the desired water level, you may need to reset the placement of the entire skimmer box.
- Make sure the pond is filled to the desired level prior to making final adjustments.
- Adjust the weir opening to the appropriate water level by loosening the thumbscrews and adjusting up or down as needed (Ex. 25). There should be approximately 3/4″ gap between the water level and the top of the exterior liner plate opening to allow proper skimming action (Ex. 5).

- Dial-in the adjustable overflow elbow so that water rising past the desired level will begin to trickle down the overflow arm (Ex. 26). Once the overflow is set, the pond owner should not readjust. Readjustment may require re-application of silicone or Teflon tape to the threads in order to provide a watertight fitting.

Aquascape Signature Series 1000 Skimmer Maintenance
Weir Door
- The Signature Series Skimmer weir door can be closed shut to temporarily drain the water in the skimmer for maintenance. Open the weir door as soon as maintenance is completed to avoid operating the pump in low water conditions for extended periods of time.
Debris Basket
- The Signature Series Skimmer is designed to sweep the surface of the water so it is free from debris. The debris basket inside the skimmer is the first filter stage of the skimmer. The basket will collect leaves, twigs, seeds and other pond debris. It takes approximately two to three minutes every other week to empty the debris basket. More frequent changes will be required during the fall and spring because of the quantity of leaves falling off the surrounding trees.
- It is a good habit to periodically lift the skimmer lid and check the quantity of debris in the basket. This is especially true in the fall. Keep a mental note as to how often your basket has to be emptied. It’s important that the debris basket is not allowed to become too full. Too much debris can reduce the water flow to the pump.
Filter Mat
- The filter mat below the debris basket is the second stage of the skimmer. The mat is designed to handle any debris that finds its way past the basket. The mat will not need maintenance as frequently as the basket, since the basket will remove the majority of debris from the water. Remove and rinse the mat when you notice excessive debris build up on the mat or reduced flow over the waterfall.
Aquascape Signature Series 1000 Skimmer Replacement Parts
- Rock Lid (#43023)
> Available at our Online Store - Debris Basket Handle (#43016)
> Available at our Online Store - Debris Basket (#43009)
> Available at our Online Store - Interior Weir Plate Assembly (#43010)
> Available at our Online Store - Weir Door (#43013)
> Available at our Online Store - Filter Mat (#56000)
> Available at our Online Store - Filter Mat Support Rack (#29655)
> Available at our Online Store
- Exterior Liner Plate (#43014)
> Available at our Online Store - Hardware Bag (#43027) – includes (12) screws and (2) liner installation tools
> Available at our Online Store - Overflow Elbow (#29149)
> Available at our Online Store - 2″ Plug (#29394)
> Available at our Online Store - (2) 2″ Bulkhead Fitting (#29103)
> Available at our Online Store - (2) 2″ MPT x 2″ Slip (#29158)
> Available at our Online Store - (2) Water Level Adjustment Thumb Screws (#43015)
> Available at our Online Store
