

Operating the EcoSeries™ Floating Fountain Control Panel
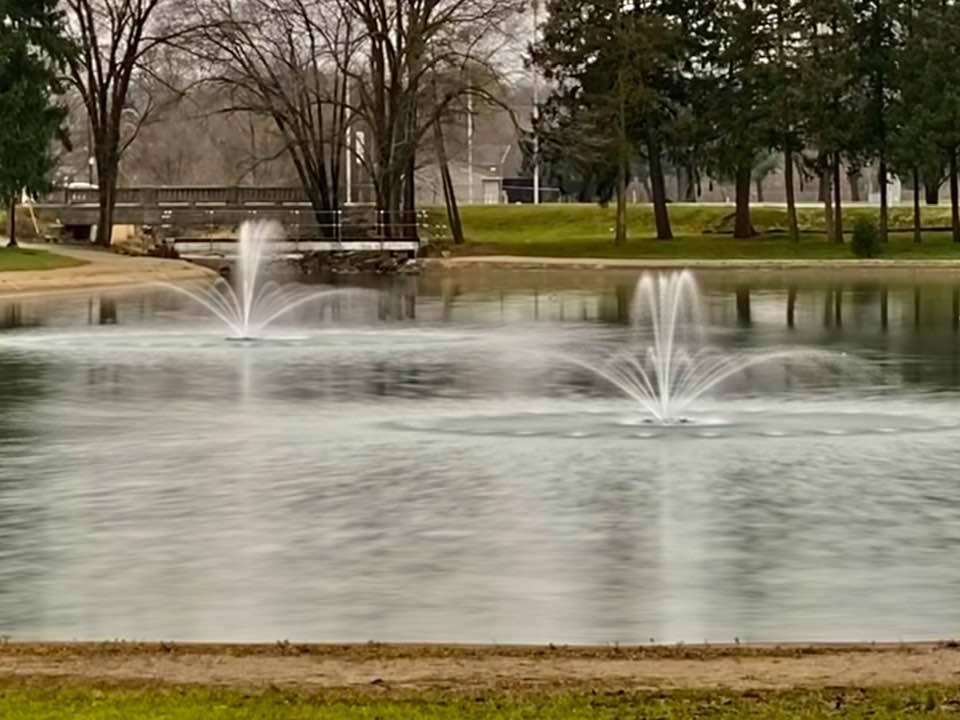
Using the control panel offers a convenient way to control the fountains and lights. If the timer and photocell are not going to be used, the fountains can be operated without the control panel.
- Plug the Control Panel into a power source.
- Make sure GFCI’s reset button is pushed in.
- Set timer pins to desired run cycles or 24 hours.
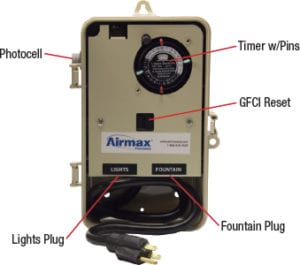
- If you are using your fountain for aeration, it is recommended to run the fountain a minimum of 10-12 hours per day, although running them longer can increase the benefits.
- Plug the EcoSeries™ Floating Fountain’s power cord into the Control Panel outlet labeled “FOUNTAIN”.
- If the Airmax® LED Fountain Light Set is installed, plug the light set’s power cord into the control panel outlet labeled “LIGHTS”.
- Minor angular adjustments may be needed to the lights to ensure the lights are illuminating the spray pattern properly.
- Lights will only operate when the fountain is running and the photocell has activated the lights. Note: Placing your control panel in a heavily shaded area or in a dark place will activate the lights continuously when the fountain is running.
RGBW Remote Control Instructions for Airmax Floating Fountains
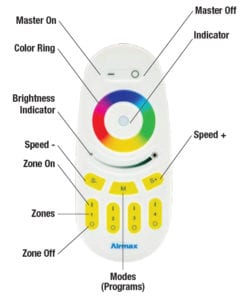 The Airmax Color-Changing RGBW LED Light Set is run by a wireless remote with a range of up to 200 feet. The wireless remote allows you to change the color, dim/brighten the lights, control flash speed and run up to nine preset programs. Your wireless remote has already been paired for your light set on Zone 1.
Requires: 2 AAA Batteries(Included).
Basic Control Functions
- Press and Hold Master ON or ZONE ON for several seconds to turn all lights to white mode (Fig. 6)
- Touch the color ring to adjustment lights to any color.
- While in white or solid color mode, use the speed buttons to change
the tone from cool to warm white or vibrant to pastel colors. - Change the brightness by using the brightness slide ring.
- Adjust flash speed for any preset program using the speed buttons.
Preset Programs/Modes
Press the “M” Mode button to scroll through the pre-programmed light settings:
- Program 1 – RGBW Fade In/Fade Out
Fades in and fades out the color red, green, blue and white one after another. - Program 2 – Color Flash
Red, green, blue, white, yellow and purple flashes. - Program 3 – Disco
Multiple colors strobe and flash. - Program 4 – Red Color Ramp Up and Flash
Red color brightens from 0%‐100% and shuts down, then flashes three times. - Program 5 – Green Color Ramp Up and Flash
Green color brightens from 0%‐100% and shuts down, then flashes three times. - Program 6 – Blue Color Ramp Up and Flash
Blue color brightens from 0%‐100% and shuts down, then flashes three times. - Program 7 – Color Change and Flash
Several colors fade into each other and then flash randomly. - Program 8 – Fade In/Fade Out
Several colors fade into each other. - Program 9 – Strobe White
White color flashes.
Linking new lights to the remote control:
- Choose which zone you want to assign the lights (1 to 4)
- Switch off the main power supply of the lights in the selected zone with the main switch or pull the plug from the socket.
- Now switch on the lights again and within 3 seconds shortly press one of the ‘Zone ON’ buttons, one time, on the remote control.
- When the link operation is successful, the lights will slowly blink on and off 3 times.