Instruction Manual, Warranty, Troubleshooting & Replacement Parts for the Aquascape Pro Air 60 Pond Aeration Kit (#61008)

Our finned friends need oxygen to breathe, just like we do. That’s why aeration is one of the most important features you can add to your pond to keep fish happy and healthy. The energy-efficient Pro Air 60 aeration kit is perfect for oxygenating ponds up to 15,000 gallons.
Aerators are great for use year-round use. Aeration is especially important in hot weather and any time a pond’s waterfalls are not running, or in the winter for keeping a hole open in pond ice.
Aquascape Pro Air 60 Instruction Manual
Aquascape Pro Air 60 Warranty
The Aquascape Pro Air 60 Pond Aeration Kit is guaranteed for three years from date of purchase.
Proof of purchase required. Warranty does not cover damage resulting from negligent handling, misuse, or lack of reasonable maintenance or care.
Warranty is valid against defects due to material and workmanship only. The sole obligation shall be to replace the defective unit with a suitable replacement unit. Units should be checked for proper operation prior to returning as defective.
No liability for loss or damage of any nature or kind, whether arising out of or from the use of the product, whether defective or not defective, is assumed by Aquascape, Inc. or its affiliates.
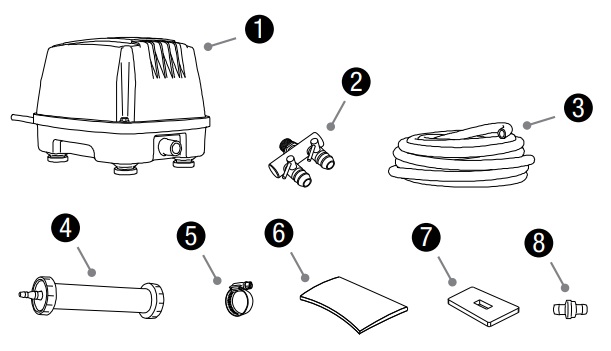
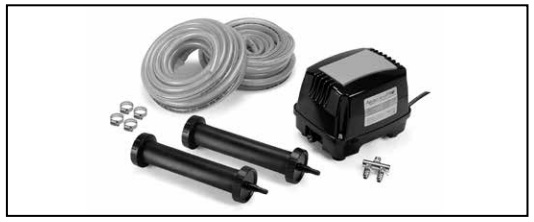
Aquascape Pro Air 60 Contents & Recommended Tools
Contents
- Pro Air 60 Aeration Compressor
- 2- Way Aeration Compressor Manifold
- (2) Pre-Installed Pro Air Check Valves
- (2) Braided Airline Tubing – 30′ Roll
- (4) Stainless Steel Hose Clamps
- (2) 10″ Rubber Membrane Aeration Diffusers
Recommended Products
Weighted Aeration Tubing
- 3/8″ x 25′ (#61011)
> Available at our Online Store - 3/8″ x 100′ (#61014)
> Available at our Online Store
Note: Upgrading to Weighted Aeration Tubing will keep airline tubing at the bottom of the pond without the use of weights.
Recommended Tools
- Screwdrivers
Pro Air Comparison Chart

 |  | |
| Pro Air 20 | Pro Air 60 | |
| Model Number | 61009 | 61008 |
| Max Air Flow Rate (Loaded) | 0.71 CFM | 2.1 CFM |
| Max Air Depth (Loaded) | 2.90 psi | 5.08 psi |
| Number of Outlets | 1 | 2 (Includes 2-Way Manifold) |
| Wattage | 15 | 45 |
| Power Cord Length | 6 feet | 6 feet |
| Dimensions | 6" x 5.5" x 4.25" | 7.75" x 7.25" x 4" |
| Aeration Diffuser | 10 in. Rubber Membrane Aeration Diffuser | (2) 10 in. Rubber Membrane Aeration Diffuser |
| Length of Airline | (1) 30 ft. Roll 3/8 in. Braided Vinyl | (2) 30 ft. Roll 3/8 in. Braided Vinyl |
| Check Valve | Included and Pre-installed | Included and Pre-installed |
| Pond Size | Up to 5,000 gal | Up to 15,000 gal |
| Max Recommended Pond Depth | 6.5 ft. | 11.5 ft. |
| Warranty (Limited) | 3 Year Limited | 3 years |
| View Product | View Product |
Aquascape Pro Air 60 Installation
STEP 1: Unpack Kit Components
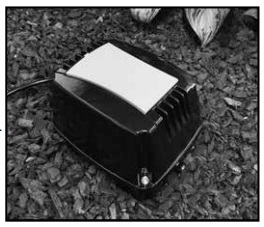
STEP 2: Set Compressor
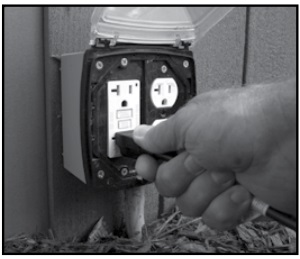
Set the compressor in the desired location. Select a location near a ground fault circuit interrupter (GFCI) rated receptacle.
Note: Do not submerge the compressor in water. We recommend placing it in a location above the pond’s water level, whenever possible, to prevent water from entering the compressor.
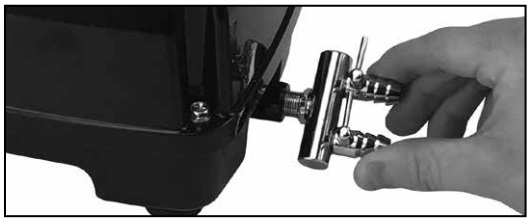
STEP 3: Attach Manifold
Thread the 2-way manifold into the discharge of the compressor. The 2-way manifold provides the option of installing up to two separate airlines with the added benefit of airflow valve controls.
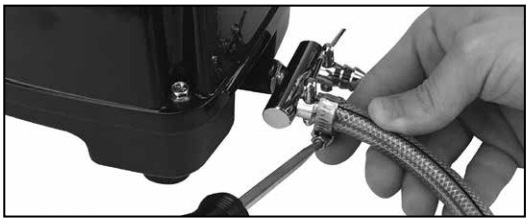
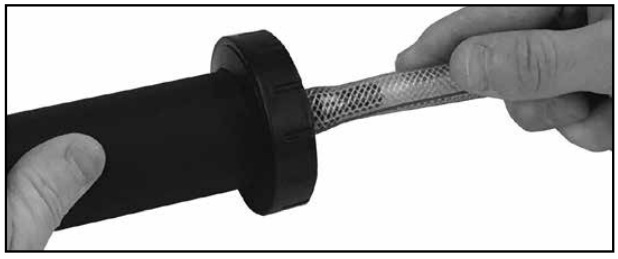
STEP 4: Attach Tubing
Attach the braided tubing with the pre-installed check valves to each manifold outlet.
Note: The check valve is designed to prevent water from siphoning back through the tubing and entering the compressor. Failure to install the check valve may result in the compressor being permanently damaged, voiding the warranty. Confirm that the check valves are facing the correct direction by verifying that air is able to flow freely through the tubing toward the diffuser.

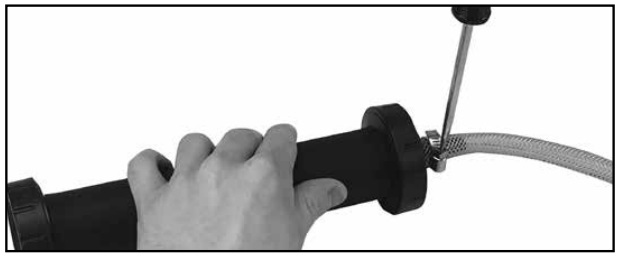
STEP 5: Secure Tubing to Manifold
Use the stainless steel hose clamps to secure the tubing to the manifold outlets.
STEP 6: Attach Diffusers
Attach the other end of the braided tubing to the diffusers.
STEP 7: Secure Tubing to Diffusers
Use the stainless steel hose clamps to secure the tubing onto each diffuser.
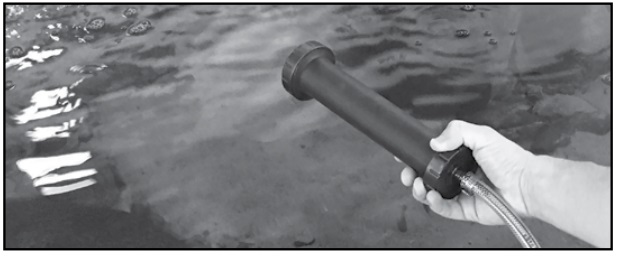
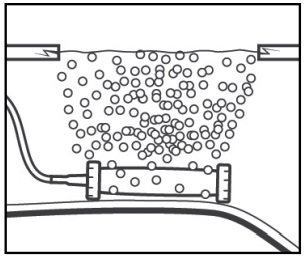
STEP 8: Set Diffusers in Pond
STEP 9: Plug in Compressor
Plug the compressor into a ground fault circuit interrupter (GFCI) rated receptacle and enjoy the benefits!
Aquascape Pro Air 60 Winter Application
The aeration kit can be used during winter months where bubbles and water movement created at the surface help to maintain a small opening in the ice for oxygenation.
DO NOT place the diffusers on the bottom of the pond during winter, as it may disrupt the natural thermocline found in the deeper portions of the pond where the fish are overwintering.
Place the diffuser about 1 to 1.5 feet below the surface of the water.
Aquascape Pro Air 60 General Maintenance
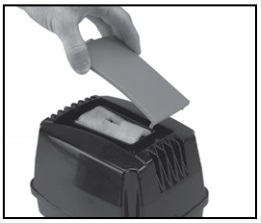
- The inlet filter should be checked annually or if the compressor makes any abnormal noises. If operating the unit in dusty conditions, you will need to check it more frequently. The filter is easily inspected by gently pulling off the filter cover. The sponge filter can be rinsed in clean water and thoroughly dried before replacing.
- The compressor components can be completely replaced, as needed, to maximize functionality. Use the Pro Air 60 Air Inlet Sponge Filters and Pro Air 60 Replacement Diaphragm to refresh the compressor.
- Winter care: the Pro Air 60 can be operated through freezing winters. If not running the compressor through the winter, it is recommended to cover the compressor or store it in a frost-free location.
Aquascape Pro Air 60 Troubleshooting
Reduced or no air flow:
- Make sure the check valve is oriented in the proper direction
- Make sure the braided tubing is not kinked or restricted
- Should a kinked tube or dirty membrane significantly block air flow, shut down the compressor immediately to prevent overheating
- Check the air inlet sponge filter for clogging and clean or replace if necessary
Compressor not working
- The GFCI may have tripped
- The compressor is not receiving the correct voltage
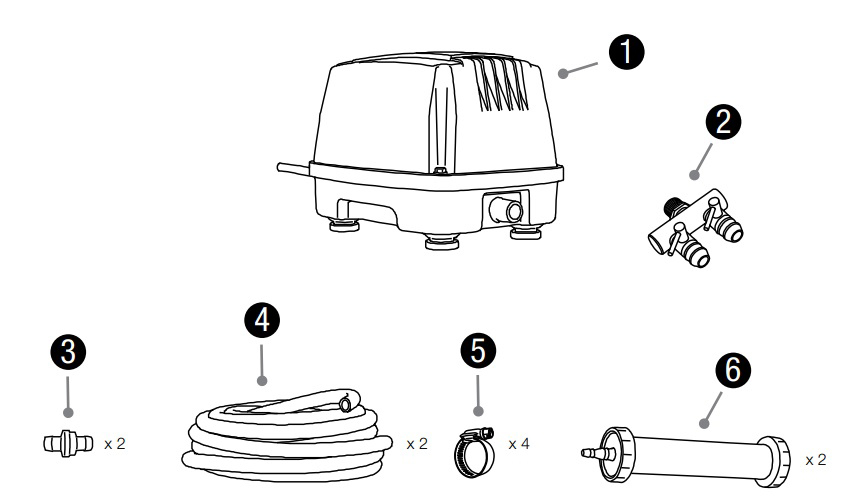
Aquascape Pro Air 60 Replacement Parts
- 61016 – Pro Air 60 Aeration Compressor
> Available at our Online Store - 61012 – 2-Way Aeration Compressor Manifold
> Available at our Online Store - 61002 – Braided Airline Tubing – 30′ Roll
> Available at our Online Store - 61010 – 10″ Rubber Membrane Aeration Diffuser
> Available at our Online Store - 99107 – (1) Stainless Steel Hose Clamp
> Available at our Online Store - 61005 – (3) Pro Air 60 Air Inlet Sponge Filters
> Available at our Online Store - 61004 – Pro Air 60 Compressor Lid
> Available at our Online Store - 61003 – Pro Air Check Valve
> Available at our Online Store - 61007 – Pro Air 60 Replacement Diaphragm (not pictured)
> Available at our Online Store